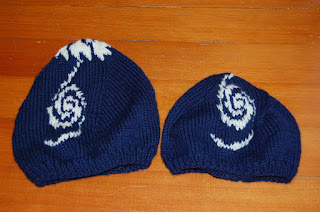
Posts

Showing posts from 2021

Snowdrift Hat

Image
Note: the stitches can get VERY tight because of the cabling every row, even if you don’t ordinarily knit  tightly, so you may want to go up a needle size or use thinner yarn to compensate. For  yarn , I used: - Caron Simply Soft for the black - Red Heart Super Saver for the white - Noro Kibou for the variegated - Red Heart Super Saver and misc. stash yarn for the 3-color gradient I used  size 6 needles  for all examples, which was perfect for the Noro and Caron and WAY too tight for the RHSS Stitch abbreviations : FC : Insert right needle into front of 2nd stitch on left needle and knit. Leave on needle. Knit first stitch and pull both off left needle. BC : Insert right needle into back of 2nd stitch on left needle & knit. Leave on needle. Knit first stitch and pull both off left needle. Pattern: CO multiple of 8 sts (I used 64 for a small hat and 80 for a larger one). Join work and PM. Base row: K1, *P2, K2 to last 3 sts, P2, K1. Continue rib for 6 rows or desired base height. Pa

Recycled Silk Shopping Bag

Image
  Well, I hauled a quart of milk in this and it worked perfectly fine, so here’s the pattern: Shopping Bag 1 ball Darn Good Yarn recycled silk “Spice Market” 1 ball Plymouth Encore Circular needles in sizes 10 and 6 6 stitch markers, 1 distinct from the rest CO 60 stitches in Darn Good Yarn on size 10 needles. Place marker and join. Thereafter, work the following until you run out of the Darn Good Yarn: Round 1: Knit around Round 2: Knit around, wrapping the yarn 4 times for each stitch Round 3: Knit around, dropping the 3 extra wraps off the needle at each stitch Switch to Plymouth yarn and the smaller needles at the same time, knitting 2 stitches in each existing stitch on your first row with the Plymouth and placing a marker every 20 stitches. You should have 120 stitches at the end of this row, divided evenly in 6 chunks. Thereafter, work the following until you have 12 stitches remaining: Round 1: ssk, knit until 2 stitches remain before next marker, k2tog. Repeat around. Round 2:

Biggo Cozy Cowl

Image
Yarn : 2 skeins Knitpicks Biggo in MC, 1 in each CC (MC used here was Garnet Heather, primary CC Aurora Heather (green), minor CC Asphalt Heather (blackish-grey)) Needles : US 13 Other materials : Polar fleece for lining (I chose a color to match the minor CC), plus needle and thread for sewing lining in Pattern : Cast on 40 sts. Working in stockinette stitch, repeat chart 5x across width of scarf (beginning with lower left of chart). Repeat chart 8x vertically, then bind off. Line with polar fleece in contrasting color of your choice, then sew ends of scarf together to close loop. This pattern uses approximately 2 full skeins of the main color, nearly a full skein of the primary CC, and less than a quarter of a skein of the minor CC. I am reasonably certain it uses less than a yard of polar fleece but I didn’t write down the measurement… when I bought the fabric the minimum order was 3 yards, so I can at least assure you that I used *dramatically* less than that. I have so much polar

Staghorn Cable Scarf

Image
Pattern 2 of 2 based on a square in a sampler afghan book my grandma gave me when I was a tiny human Yarn : Cascade Eco+ in Satine Needles : Size 10 needles of any shape, plus cable needle Stitches: BC:  place 2 sts on cable needle and place behind work. K2, then K2 off cable needle FC:  place 2 sts on cable needle and place in front of work. K2, then K2 off cable needle SC:  place 1 st on cable needle and place in front of work. K2, then K1 off cable needle. Pattern: CO 26 sts First row: P1, K3, P1, K16, P1, K3, P1 Row 2 (and all even rows): K1, P3, K1, P16, K1, P3, K1 Row 3: P1, SC, P1, K4, BC, FC, K4, P1, SC, P1 Row 5: P1, K3, P1, K2, BC, K4, FC, K2, P1, K3, P1 Row 7: P1, SC, P1, BC, K8, FC, P1, SC, P1 Row 9: P1, K3, P1, K4, BC, FC, K4, P1, K3, P1 Row 11: P1, SC, P1, K2, BC, K4, FC, K2, P1, SC, P1 Row 13: P1, K3, P1, BC, K8, FC, P1, K3, P1 Repeat rows  2-13  until scarf is as long as you’d like, ending on a row 13. Repeat Row 2 once more, then BO. Drape on nearest cat for Pinterest-

Staghorn Cable Hat

Image
This is pattern 1 of 2 based on a square in a sampler afghan book my grandma gave me when I was a tiny human Warning: The crown of this hat is kind of poorly-defined because I didn’t write down how I did it as I went and do not actually remember precisely what I did. Sorry about that. Yarn : Cascade Eco+ in Satine Needles : Size 10 circular needles, plus cable needle Stitches: BC:  place 2 sts on cable needle and place behind work. K2, then K2 off cable needle FC:  place 2 sts on cable needle and place in front of work. K2, then K2 off cable needle SC:  place 1 st on cable needle and place in front of work. K2, then K1 off cable needle. Pattern: CO 60 sts. Join and work in K2 P2 rib for 1-2 inches. Row 1 : SC, P1, K2, P2, K1, BC, FC, K1, P2, K2, P1, SC, P4, SC, P3, K2, P1, BC, FC, P1, K2, P3, SC, P4 Row 2 : K3, P2, K1, P2, K10, P2, K1, P2, K3, P4, K3, P3, K2, P1, K8, P1, K2, P3, K3, P4 Row 3 : K3, P2, K1, P1, BC, K4, FC, P1, K1, P2, K3, P4, K3, P3, K1, BC, K4, FC, K1, P3, K3, P4 Row 4

Whirlpool Galaxy Hat

Image
I made my friend a hat with  Messier 51  on it as a graduation present. Here’s the pattern. Above is an image of the two variations - on the left, the looser, taller beanie, and on the right, the original design, which fits a bit tighter. Materials : 2 skeins Cascade 220 in different colors: I used a sort of midnight blue for MC and cream for CC Needles : Size 6 – Circular or DPN CO 80 sts Join, work in k1, p1 rib for 6 rows Row 7: *k5, m1 across. 96 sts. K 3 rows. Work chart as follows: k 30, work chart row, k to end Starting at the row above the red line, dec 3 sts evenly across every row (first decrease row should look like *k30, k2tog* across, then each subsequent row should have one fewer stitch between decreases). Continue to work chart in same position relative to previous chart rows – there’ll be fewer than 30 stitches before the pattern starts, but that’s as it should be… At some point, a line of decreases will overlap with the chart. Don’t worry about it – the leftmost edge o

Basic Cable Scarf

Image
Pattern created in 2012, copied from my now-defunct tumblr. Yarn : 1 skein Cascade 220 (I used color 2414 or 7824) Needles : US Size 8 Stitches : C3P1: slip 3 st to cable needle, hold to front of work, p1 off left needle, k3 off cable needle C3K1: slip 3 st to cable needle, hold to back of work, k1 off left needle, p3 off cable needle C3K3: slip 3 sts to cable needle, hold to back of work, k3 off left needle, k3 off cable needle C3P3: slip 3 sts to cable needle, hold to back of work, p3 off left needle, p3 off cable needle C1P3: slip 1 st to cable needle, hold to front of work, p3 off left needle, k1 off cable needle C1K3: slip 1 st to cable needle, hold to back of work, k3 off left needle, p1 off cable needle Central stitch: p3 k3 p24 k3 p3 on RS, k3 p3 k24 p3 k3 on WS Pattern : Cast on 36 stitches. Work in k3/p3 rib for 12 rows. *Next row: p3, C3P1, make 1 p in next st, p until 7 sts remain, C1K3, p3 Next row: k4, C3K1, k20, C1P3, k4 Continue in pattern (increase number of sts outsid