Whirlpool Galaxy Hat
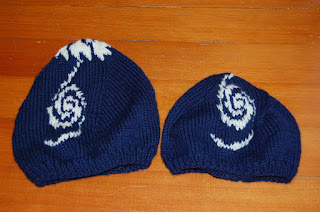
I made my friend a hat with Messier 51 on it as a graduation present. Here’s the pattern. Above is an image of the two variations - on the left, the looser, taller beanie, and on the right, the original design, which fits a bit tighter.
Materials:
2 skeins Cascade 220 in different colors: I used a sort of midnight blue for MC and cream for CC
Needles: Size 6 – Circular or DPN
CO 80 sts
Join, work in k1, p1 rib for 6 rows
Row 7: *k5, m1 across. 96 sts.
K 3 rows.
Work chart as follows: k 30, work chart row, k to end
Starting at the row above the red line, dec 3 sts evenly across every row (first decrease row should look like *k30, k2tog* across, then each subsequent row should have one fewer stitch between decreases). Continue to work chart in same position relative to previous chart rows – there’ll be fewer than 30 stitches before the pattern starts, but that’s as it should be…
At some point, a line of decreases will overlap with the chart. Don’t worry about it – the leftmost edge of the galaxy will follow the line of decreases to form a nice curve. Once the chart has been completed, extend the single white stitch upwards in the same position as you continue knitting.
When 15 stitches remain, *k 2 MC, k 1 CC* across
Next row: *k 1 MC, k 1 CC* across
Switch entirely to CC for the remainder of the hat
When 3 stitches remain, cut yarn and pull through remaining stitches.
Sew in ends.
Variation: To make a larger, looser hat, decrease every other row


Comments
Post a Comment